Have you ever wondered why currency prices in the forex market move up and down? Behind every fluctuation lies one fundamental economic principle at work: Forex Supply and Demand. Understanding this concept isn’t just theoretical—it’s the key to reading market movements, identifying precise entry and exit opportunities, and ultimately, increasing your profit potential.
This article will take you deep into the heart of Forex Supply and Demand, from the basic concepts to how you can apply them in your trading strategy.
Understanding the Basics of Forex Supply and Demand
The concept of Forex Supply and Demand works just like the law of supply and demand in traditional markets. These are two opposing forces that interact and determine the price of an asset.
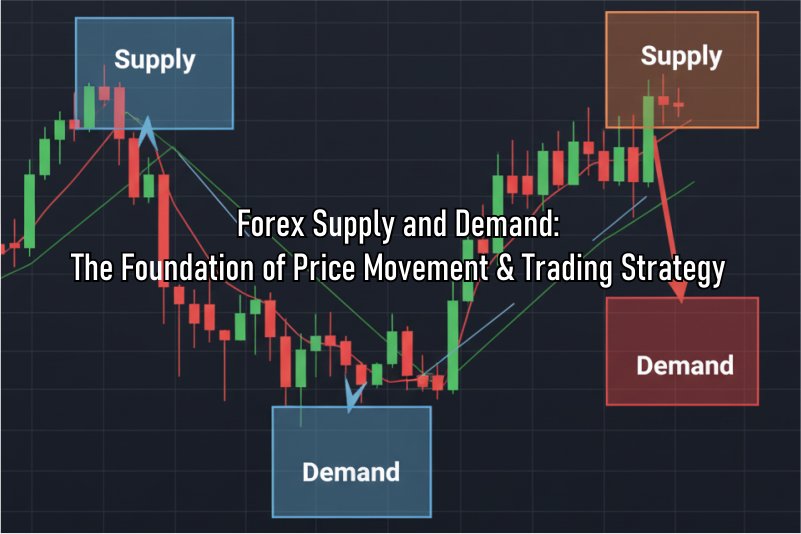
What Is a Supply Zone?
A Supply Zone is a price area where selling pressure outweighs buying pressure. It typically forms after a strong upward price move followed by a sharp decline, as many traders begin to sell.
Characteristics of a Supply Zone:
- Forms after a price surge followed by a sharp drop.
- Indicates seller dominance.
- When price revisits this zone, there’s a high chance of rejection or downward reversal.
- Often referred to as a potential resistance zone.
What Is a Demand Zone?
Conversely, a Demand Zone is a price area where buying pressure outweighs selling pressure. It forms after a sharp price drop followed by a strong rally, as many traders start buying.
Characteristics of a Demand Zone:
- Forms after a steep decline followed by a quick rebound.
- Indicates buyer dominance.
- When price revisits this zone, there’s a high chance of rejection or upward reversal.
- Often referred to as a potential support zone.
Important: The Forex Supply and Demand concept differs from traditional support and resistance. While support and resistance are often represented by single lines or levels, Supply and Demand are zones—broader areas of price action.
Why Supply and Demand Matter in Forex Trading
Forex Supply and Demand are the backbone of price movement. By identifying these zones, you can understand the market psychology behind price action—where large institutions and smart money are likely to enter or exit their trades.
Identifying Key Price Zones
- Institutional Order Zones: Supply and Demand zones often mark areas where large orders from banks, hedge funds, and other institutions are placed. When price returns to these zones, previously unfilled orders may be triggered, sparking new movements.
- Potential Turning Points: These zones act like price magnets. When price reaches a Supply zone, it tends to reverse downward; when it reaches a Demand zone, it tends to move upward. This forms the core foundation for finding precise entry points.
Read Also: Understanding Candlestick Patterns for Entry Confirmation
Steps to Identify and Trade Using Forex Supply and Demand
Applying the Forex Supply and Demand strategy takes practice, but the concept itself is straightforward.
1. Spot Strong Price Movements
Look for areas where price moved aggressively, leaving behind large consecutive candlesticks in one direction. This indicates a significant imbalance between Supply and Demand.
2. Identify the Base (Consolidation Zone)
Before or after a strong move, price often consolidates or moves sideways—this is known as the Base. It’s where large orders are likely being accumulated or distributed.
3. Draw Your Zones
- Supply Zone: Draw a rectangle from the highest candlestick in the base to the lowest candlestick in the base before the sharp drop.
- Demand Zone: Draw a rectangle from the lowest candlestick in the base to the highest candlestick in the base before the sharp rally.
4. Set Entry, Stop Loss, and Take Profit
- Entry: Wait for price to return to the Supply zone (for sell) or Demand zone (for buy).
- Stop Loss: Place it slightly above the Supply zone (for sell) or slightly below the Demand zone (for buy).
- Take Profit: Target the next significant Supply or Demand level, or use a proper risk-reward ratio (e.g., 1:2 or 1:3).
5. Use Additional Confirmations
Although Supply and Demand zones are powerful, it’s best to confirm with:
- Reversal candlestick patterns within the zone.
- Momentum indicators (RSI, Stochastic) signaling overbought or oversold conditions.
- Trading volume (if available on your platform).
Conclusion: Master Supply and Demand for Smarter Trading
Forex Supply and Demand is one of the most powerful yet often overlooked concepts in trading. It’s not just economic theory—it’s a roadmap showing where buyers and sellers are most active. By mastering how to identify Supply and Demand zones, you’ll gain deeper insight into price behavior and make more informed, accurate trading decisions.
Remember, practice is key. Start by identifying these zones on higher timeframes, then move down to smaller ones to find precise entry opportunities. Happy trading!
Frequently Asked Questions About Forex Supply and Demand
Q: Is the Supply and Demand strategy suitable for all timeframes?
A: Yes, the Forex Supply and Demand concept applies to all timeframes—from minute charts to monthly charts. However, zones from higher timeframes tend to be stronger.
Q: How is it different from Support and Resistance?
A: Support and Resistance are typically single price levels, while Supply and Demand are zones or areas of price action. Supply and Demand zones are considered stronger because they represent institutional order accumulation.